

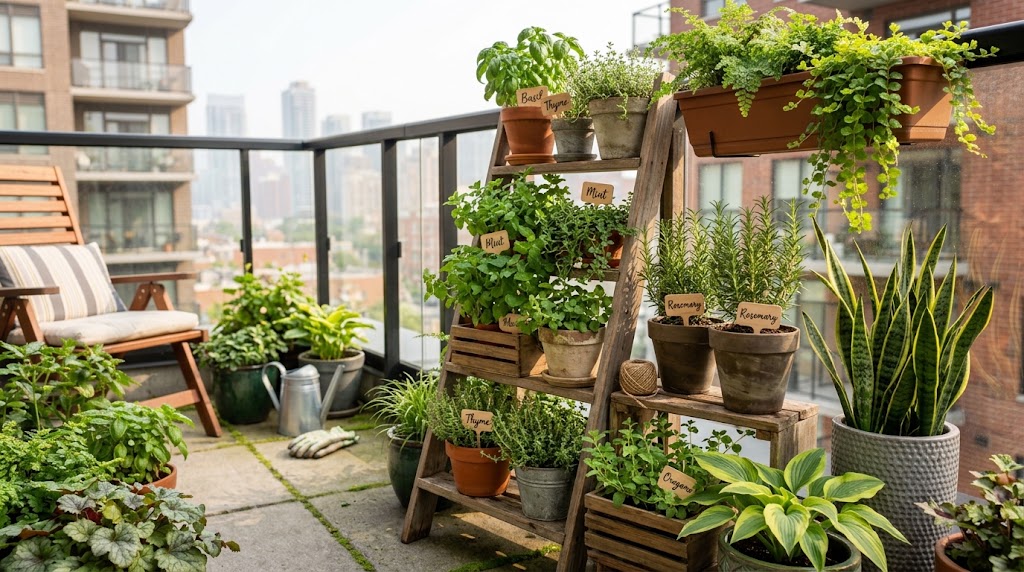
When I first moved into my 4th-floor apartment, I had big dreams of cooking with fresh home-grown herbs every single night. The problem? My balcony was barely 4 feet wide.
After setting down a table, two chairs, and a single pot of tomatoes, I ran out of floor space immediately.
I almost gave up until I realized I was making a classic beginner mistake: I was only thinking horizontally. The moment I started building upward, my tiny outdoor space transformed.
Today, my vertical herb garden balcony setup gives me fresh basil, mint, rosemary, and thyme all season long, while taking up less than two square feet of floor space.
If you rent your apartment like I do, you know the biggest hurdle: you cannot drill holes into exterior walls. Landlords hate wall damage, and heavy bolts can ruin building siding.
According to container gardening research from Penn State Extension, vertical tier systems allow apartment growers to maximize ambient sunshine while keeping plant weight safely supported.
Here are the 5 exact steps I used to build a sturdy, budget-friendly vertical herb garden that is 100% renter-approved.
1. Pick a Freestanding Frame (Zero Wall Damage)
The secret to renter-friendly vertical gardening is choosing a support system that stands on its own two feet. You want a frame that rests firmly on the balcony floor or hooks over the railing without permanent wall anchors.
Here are three reliable freestanding options I have tested:
- The Leaning Wooden Ladder: This is what I currently use. An old wooden step ladder leaned against the balcony wall gives you instant tiered shelves. No screws, no anchors, zero damage.
- Tiered Metal Plant Towers: Lightweight bamboo or iron plant stands offer multiple stacked shelves. They are cheap (usually under $35) and assemble in 10 minutes.
- Over-the-Railing Planter Brackets: Sturdy metal brackets that hang directly over balcony balustrades. They turn unused railing space into prime garden space.
- Choosing the right frame is the foundation of a successful vertical herb garden.
2. Match the Right Herb to the Right Shelf
One mistake I made early on was placing all my herbs randomly. Different culinary herbs have very different light and moisture cravings.
When arranging your vertical stand, use this layout:
- Top Shelves (Full Sun & Dryer Soil): Put your Mediterranean herbs here. Rosemary, thyme, oregano, and sage love intense sunlight and heat. Placing them up top ensures they get maximum sun.
- Lower Shelves (Partial Shade & Cooler Soil): Place leafy herbs like basil, parsley, cilantro, and chives on bottom tiers where the upper shelves cast light afternoon shade.
My Golden Rule for Mint: Never plant mint in a shared planter! Mint roots spread aggressively and will choke out your other herbs within weeks. Always give mint its own dedicated pot on your vertical stand.
Using lightweight containers ensures your vertical herb garden stays safe and portable.
3. Use Lightweight Containers and Soil Mix
Weight builds up fast when you stack pots vertically. Heavy terracotta or ceramic pots look great, but they can overload wooden ladder shelves and make moving pots a nightmare.
I recommend switching to:
- BPA-Free Resin Pots: Durable, weather-resistant, and a fraction of the weight of clay pots.
- Fabric Grow Bags: Extremely lightweight and breathable. They fold completely flat when lease renewal time comes around.
For soil, skip heavy topsoil or garden dirt. Fill your pots with a lightweight potting mix blended with perlite and coconut coir. This retains moisture while keeping your vertical stand light and safe.
Securing your stand properly will protect your vertical herb garden during unexpected windstorms.”
4. Anchor Your Stand for Wind Safety
Balcony winds can get surprisingly fierce, especially on higher floors. You do not want a summer storm knocking your vertical herb stand over onto your balcony floor—or worse, over the railing.
Here is how I keep my vertical garden stable:
- Put Heavy Pots at the Base: Place your largest, heaviest pots on the bottom shelf to create a low center of gravity.
- Use Heavy-Duty Zip Ties: Wrap industrial-strength outdoor zip ties around your plant frame and balcony railings. Zip ties hold structures rock-solid during high winds, cost pennies, and snip right off with scissors when you move out.
- Control Water Runoff: Position upper pots so excess water drips cleanly into lower containers or onto drip saucers. This keeps runoff from splashing onto your downstairs neighbors!
- Building a balcony vertical herb garden is one of the best ways to grow fresh herbs in small spaces.
5. Master the Vertical Watering Routine
Because vertical gardens sit higher off the ground, they catch more breeze and dry out faster than traditional containers on the floor.
Check your herb pots every two days. Stick your finger two inches into the soil—if it feels dry, water deeply until you see runoff.
Always water your top shelf first. Any extra runoff will naturally trickle down to nourish the lower shelves, saving you water and time.
Lastly, harvest leaf tops frequently! Pinching off the top clusters of basil and oregano forces the plants to branch out, giving you bushy, lush vertical greenery all summer long.
Frequently Asked Questions (FAQ)
Can I build a vertical herb garden on a shaded balcony?
Yes! Parsley, mint, cilantro, and chives thrive in bright indirect light. Put shade-tolerant leafy herbs on middle and lower shelves, and reserve the brightest top spot for rosemary or thyme.
How do I stop vertical plant water from dripping onto lower neighbors?
Use saucer drip trays under your bottom containers, or choose self-watering vertical planter boxes with built-in water collection basins.
Summary Checklist for Renter-Friendly Vertical Gardens
- ✅ Choose a freestanding ladder or over-the-railing holder.
- ✅ Place sun-loving Mediterranean herbs up top and shade herbs below.
- ✅ Use lightweight resin containers or fabric grow bags.
- ✅ Secure your vertical stand to balcony railings using heavy-duty zip ties.
- ✅ Harvest leaf tops weekly to keep plants compact and bushy.